
If you’re familiar with Docker, then you have likely have the commands docker build and docker run burned into your brain.
However, few people understand how they work.
The traits that have made Docker successful have also made it a blackbox — the convenience and abstractions. These commands accomplish many things, but Docker deftly hides this complexity so you can focus on other things.
But if you’re like me, you love to learn more about how the tools you use work. So come with me on a journey as we explore the depths of Docker.
In this post, you’ll learn exactly how Docker converts a Dockerfile into an image, and how that image makes it’s way into production.
Let’s dive in.
The Dockerfile is the DNA

The Dockerfile can be thought of as the DNA of a container image. It has the instruction set needed to generate and recreate an image.
When you run docker build, Docker reads and parses the Dockerfile to create the instruction set. Each line of the Dockerfile defines a command that must be run in order to create the image.
For example:
RUN apt-get install -y gitwill download the git binary into the image.
After Docker parses the file, each command is then sent to the Docker daemon to be executed.
The Docker daemon
If the Dockerfile is the DNA, then the Docker daemon is the ribosome.
Just as ribosomes use the instructions in DNA to create the proteins that make up enzymes, the Docker daemon uses the instructions from the Dockerfile to create the layers that make up the container image.
And just like biology, Docker’s image building process is quite fascinating and involved.
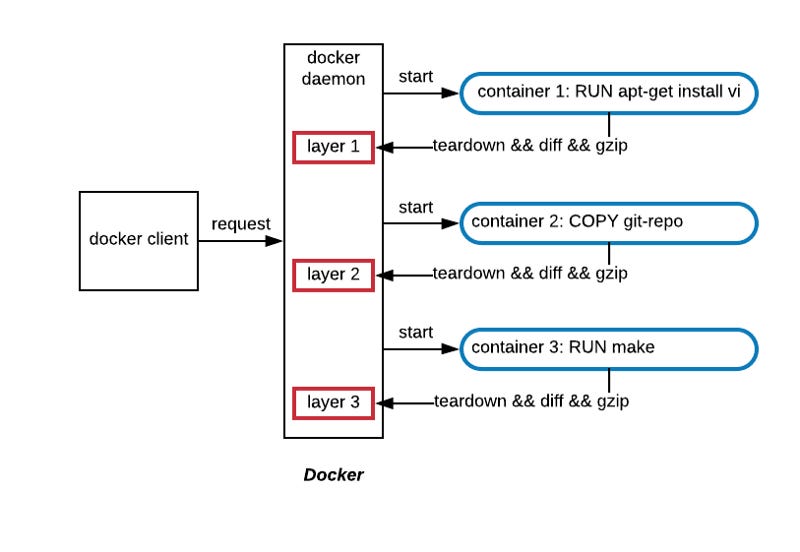
When each command from the Dockerfile is sent to the Docker daemon, the daemon creates a sandboxed environment to run the command in.
This sandbox is essentially a lightweight container as it uses namespaces and cgroups to isolate it. The reason the daemon creates this sandbox is to isolate the image building process from the host.
Docker wants these image builds to be deterministic and idempotent. It doesn’t want the image to either affect the host or be dependent on it.
On the face of it, Docker creating an image layer for each command seems rather wasteful.
Does it copy the filesystem from the previous layer to the next layers?
Does it build each layer each time?
As it turns out, Docker has made some optimizations to their build process.
Copy on Write
The first optimizations is that it uses a copy-on-write file system to optimize the layer sizes.
When the Docker daemon runs a command from the Dockerfile, it first mounts the previous image layer to the sandbox as a read-only file-system. Any changes that’re made to the filesystem by the new command are captured and stored in the sandbox as the new image layer.
Only the files that have changed are copied, allowing each image layer to remain small. Each image is a filesystem diff.
After the image layer has been created, it is then compressed, stored to disk, and a checksum is generated from its contents. This checksum is used as both an ID and to keep track of the layer’s contents.
The checksum plays an important role, which I’ll discuss more in a moment.
The Build Cache
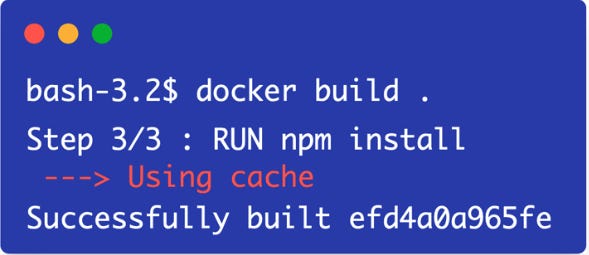
The next optimization that Docker came up with was a build cache.
It’s an expensive process to build each image layer from scratch and store it to disk, especially if many of those layers don’t change in between builds.
That’s why Docker came up with the build cache.
As the Docker daemon iterates over the Dockerfile layers, it’s able to detect if it’s already created a certain layer or not. It does this by comparing commands to the ones executed in previous builds.
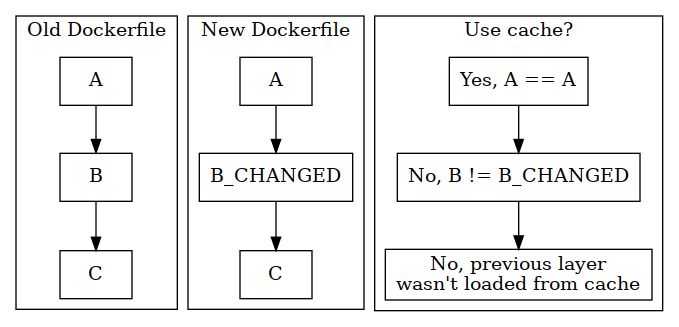
For example, COPY and ADD are both commands that bring in external files into the image. If neither the command itself, or the contents of the files, were changed between builds, then it will reuse the image layer from the cache.
RUN executes a command inside the image. If Docker detects that the command itself has not changed, it’ll reuse the previous image layer.
However, this can be a bit tricky.
In the case of RUN git clone <github-repo>, Docker will reuse the cached image layer if the command itself hasn’t changed, even if the contents of the GitHub repo have changed.
This can lead to stale images and hard-to-detect bugs.
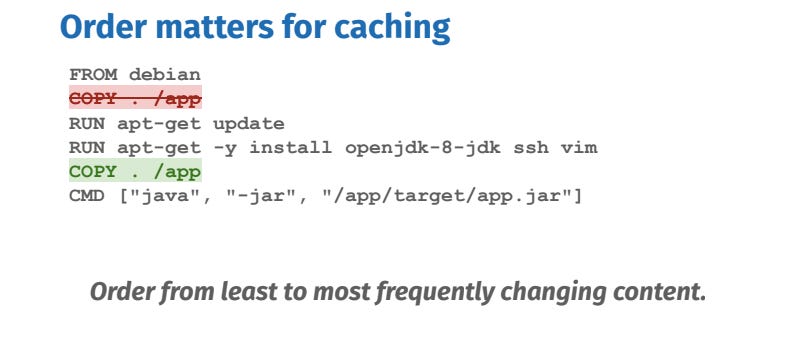
Another thing to note is that if Docker detects an update in one layer, it’ll recreate all the following image layers as well, even if they haven’t changed.
It’s recommended to put any commands that may frequently change towards the end of the Dockerfile.
Running the container
Building an image is nice and all, but the whole point of creating it was to use it. So how does Docker actually use the image when it runs a container?
Much like the build process, running the image is an involved process.
To start, you need to execute docker run and specify the image you want to run.
Docker executes this in a couple different ways depending on some factors. The main factor being, does the image exist in the cache.
Image is not cached — return of the checksum
In the case where the image isn’t cached, Docker needs to download it from the registry. To do so, the daemon sends a request to the container registry to fetch the image manifest.
The image manifest is a JSON file that contains information about each layer, such as its size, media type, and checksum of the contents.
And this is where the checksum from the build phase comes in.
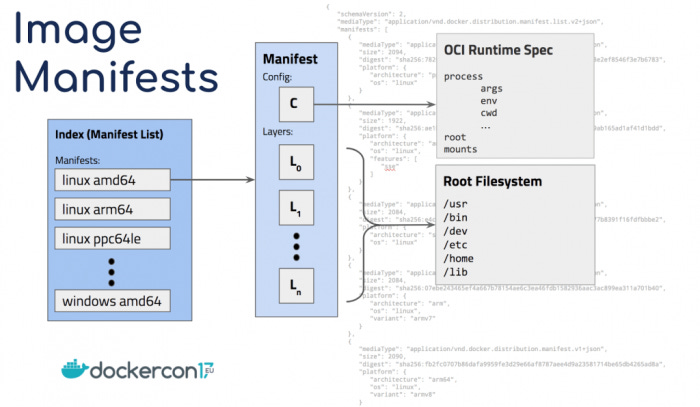
While an entire image may not already be cached, it’s possible some of the layers already are.
To speed up the image download, Docker first checks if the layer’s checksum from the manifest already exists in the local build cache.
If it doesn’t, then Docker issues a request to download the image layer from the registry. But if it does, then it uses the layer from the cache.
This way, you don’t need to download the entire image every time a layer changes.
The checksum also serves to verify the integrity of the image. When Docker downloads a layer, it calculates its checksum. If the calculated checksum doesn’t match the checksum in the manifest, it means the image has been corrupted and Docker will abort the download.
Assuming the image gets downloaded successfully, the image ID gets cached in the local build cache. Docker knows it doesn’t need to pull that image from the registry and can pull it from the cache.
However, pulling the image is only half of the process of running a container. We still need to create the container.
Creating the container
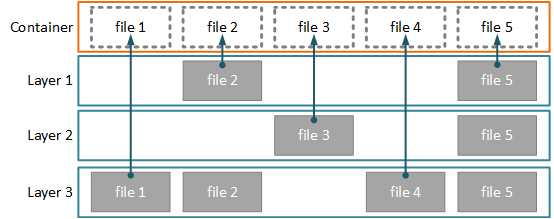
Since an image is broken up into layers, Docker needs to generate the container’s filesystem by stacking the layers together.
Since each layer in the image represents a filesystem diff, so you might be wondering how Docker is able to combine them into a single filesystem?
This is achieved by using a union filesystem, such as OverlayFS.
A union filesystem is a technology that allows multiple filesystems to appear as a single, cohesive one.
From the inside of the container, it looks like just a single filesystem. But from the outside, it appears like multiple directories stacked on top of each other.
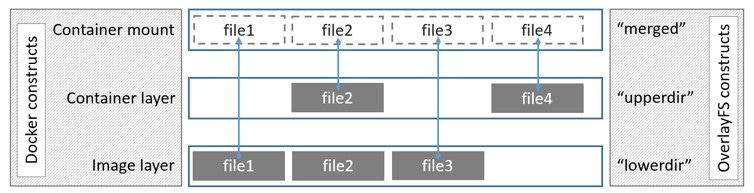
When Docker creates a container, OverlayFS makes the layered file system that consists of the read-only layers of the container image and a single writable layer.
This writable layer is where the container itself is able to write data. However, this layer isn’t persisted. So when the container disappears, so does this layer and the data stored in it. That’s why data does not persist between container restarts.
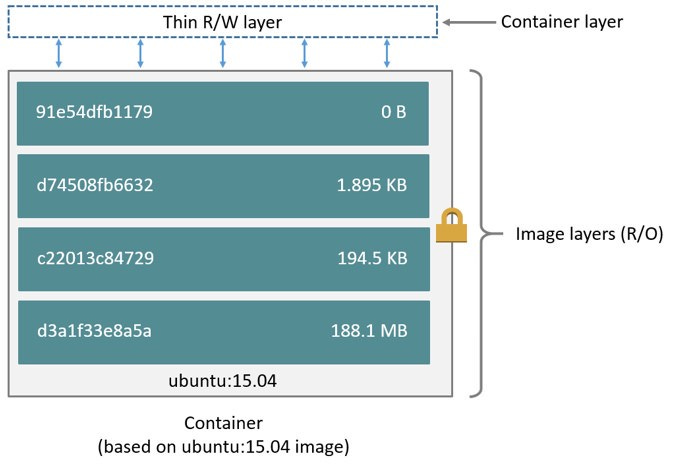
Each of the read-only directories in the container’s image are combined into a “merged” directory
When a file is accessed in the merged directory, OverlayFS looks for the file in the upper layer first.
If the file isn’t there, Docker looks for the file in each of the lower layers until it’s found.
You can inspect a container’s file structure yourself by running this command:
docker inspect - format='{{json .GraphDriver.Data}}And that is the wondrous journey of a container image. From the Dockerfile, to the container registry, and finishing as a container in production.
I hope you found this post helpful. And I also hope it helps to appreciate how remarkable it is that Docker was able to abstract away so much into 3 simple commands: build, pull, and run.
It goes to show why Docker became as successful as it did. Its focus on the developer experience is second to none.
The more I learn about, and use, containers the less surprised I am about why they marked a new paradigm shift in tech.